Creating a Share Button for Your App - Apple Club |
Back to: 
Tweet
Lots of Apple apps as well as third-party apps incorporate a "share" button in the toolbar of the app to send files or other data over a variety of venues - for example, email, iMessage and AirDrop. While it is relatively straightforward to create some form of sharing button, this article will detail how to design one that functions exactly the same as one found in many built-in macOS apps.
Create a Toolbar
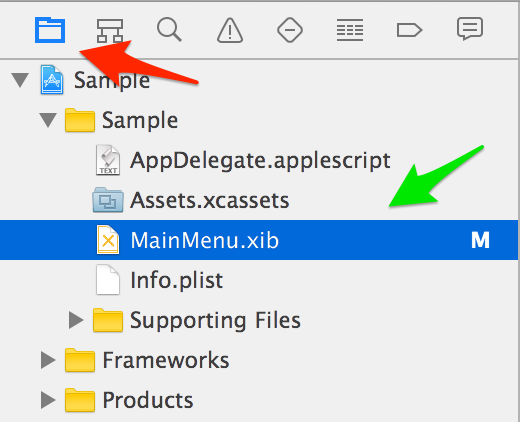
If you have not already done so, add a toolbar to the window that you want to add the share button to. This is done in Interface Builder. If you are new to Xcode, Interface Builder is accessed by selecting the .xib file for your interface from the project navigator in Xcode.
For reference, .xib is the file extension for an uncompiled Interface Builder document. The .nib file extension is the compiled version, and you will see these in your application's bundle when you build it.
Select the NSWindow that you want to add the button to. An NSWindow's icon will look like this in Interface Builder:

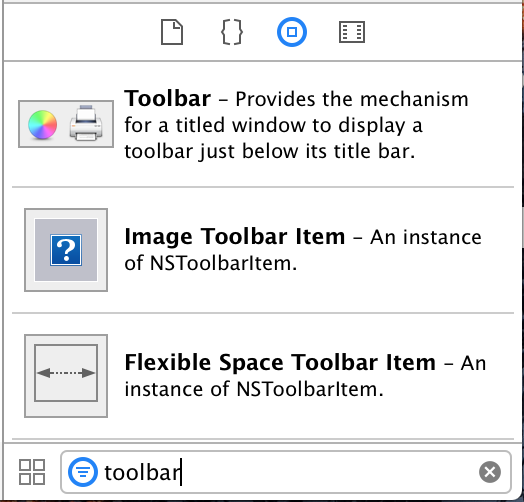
Next, in the object library on the lower right, search for "toolbar," and when the results populate, drag a toolbar object to the title bar of the NSWindow.
Add a Drop-Down Menu
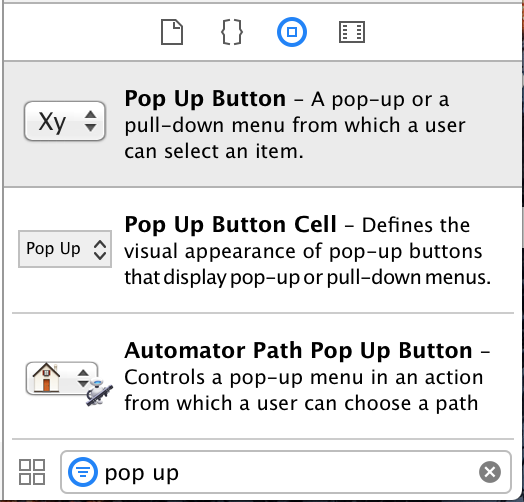
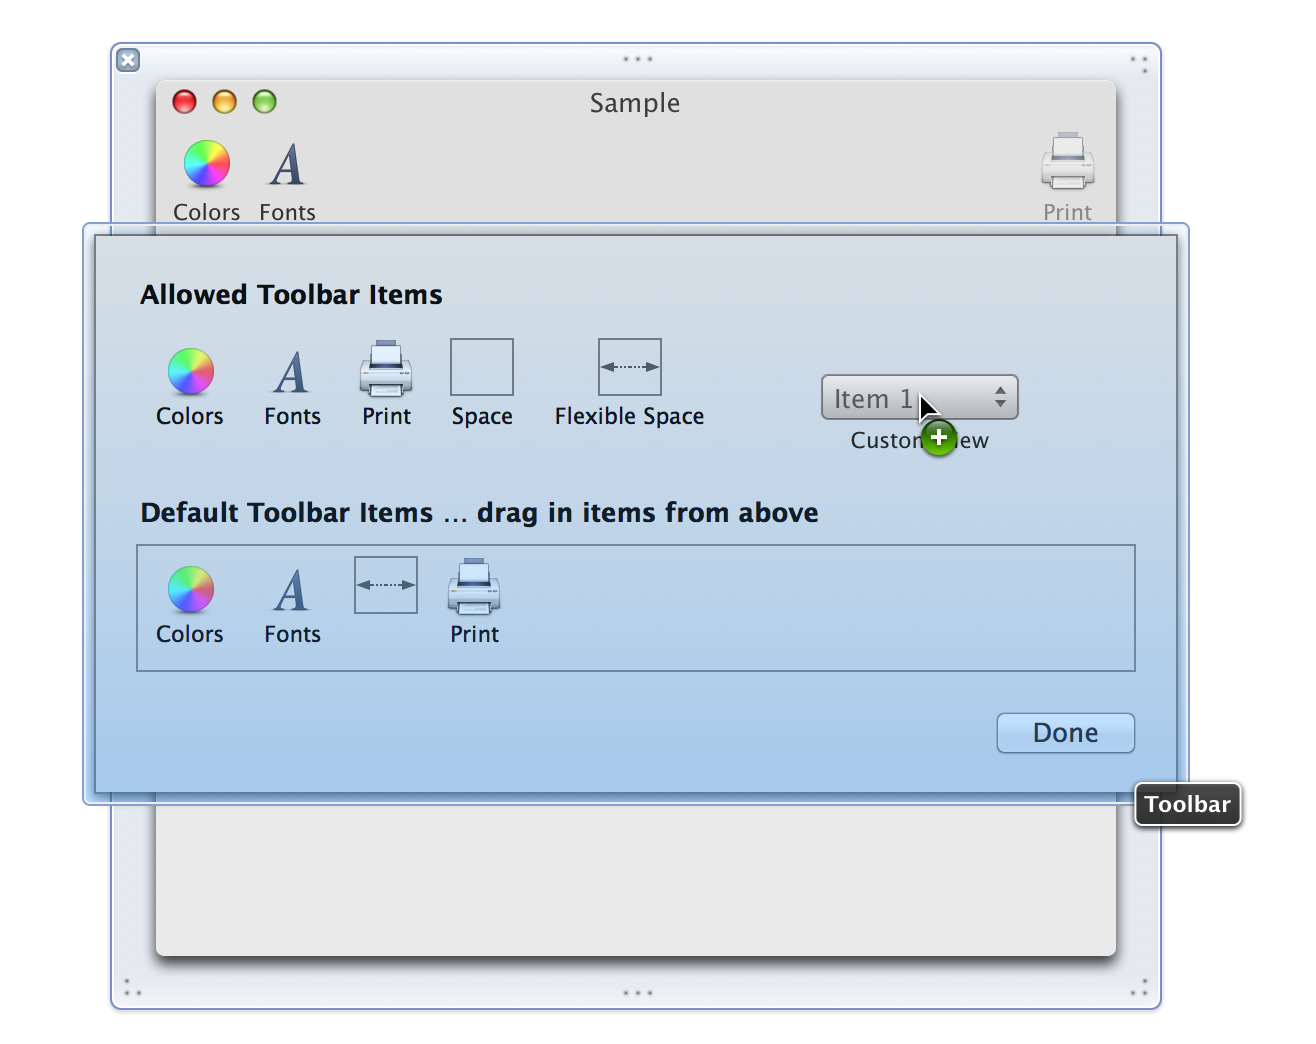
Now, to create the share button in the toolbar, you may assume that you would use a normal push button, however, we will actually use an NSPopUpButton. In the object library, search for "pop up," and drag a pop up button object to the toolbar of your window in Interface Builder. Wait a second until the toolbar expands, then add it to the "Allowed" section.
 |
 |
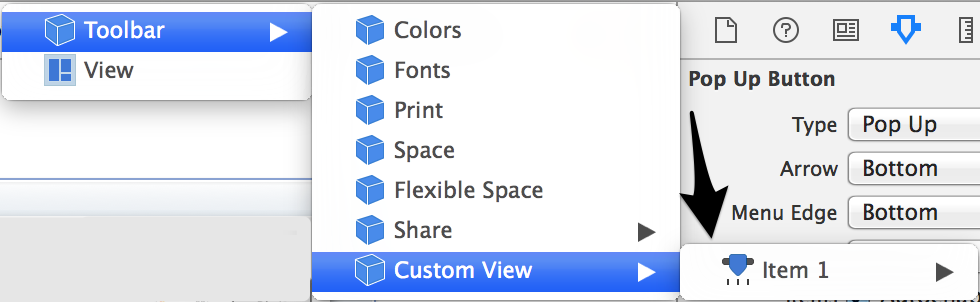
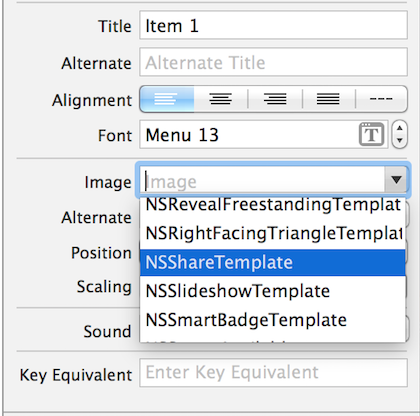
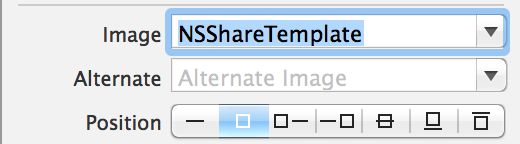
Next, it is time to edit the button's size and type to look like the built-in share button. First, make sure that you are editing the NSPopUpButton object and not the NSToolbarItem object. If you click on the pop up button in the toolbar as it appears in Interface Builder, this will select the NSToolbarItem object. Click on the pop up button object in the toolbar, and in the path bar at the top center of Xcode's window, it should now show "Custom View" (unless you changed its title) as the rightmost item in the hierarchy. Click on this, then click on "Item 1," which represents the actual NSPopUpButton object (unless you changed its title). Note that the NSPopUpButton object has an image of a slider next to it, as shown below. As an alternative to the path bar, you can simply click on the toolbar item in Interface Builder, wait a second (so it doesn't register as a double click), and then click on it again. This will also select the NSPopUpButton.
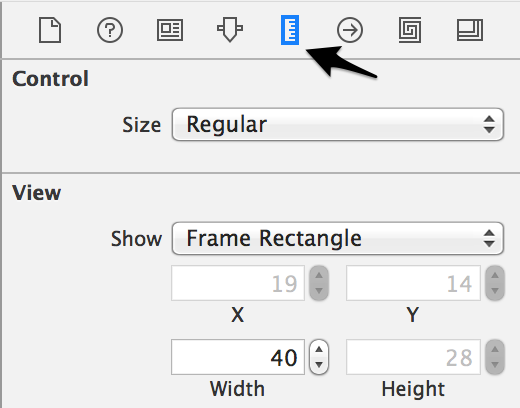
Now, select the size inspector in the upper right. Under the "View" section, set the width to 35 pixels.
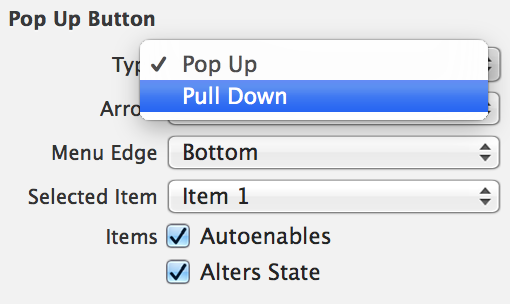
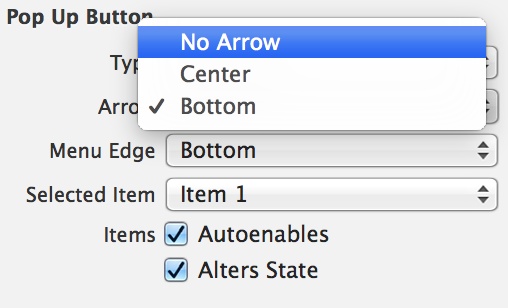
Next, select the attributes inspector, just to the left of the size inspector. There are three changes to make. Change the type from "Pop Up" to "Pull Down," and change the arrow from "Bottom" to "No Arrow." Now, the button will look like a generic push button, but has an NSMenu associated with it since it's really a pop up button. If the arrow is still there after changing the property, try selecting the NSToolbarItem by clicking on it in the toolbar, going to the size inspector, and changing the "size" value from regular to small, then back to regular. This should force the arrow change to be reflected in the toolbar. Now, select the NSPopUpButton again, as described above.
 |
 |
 |
 |
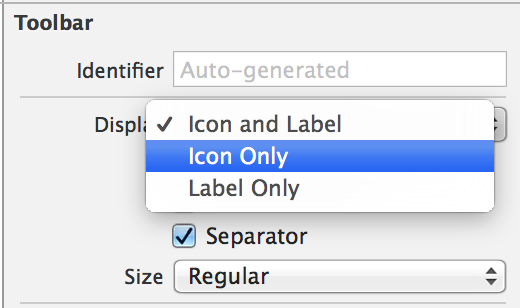
Now, click on a blank space in the toolbar for your window to select it. In the attributes inspector, set the display to "Icon Only." You can leave the label beneath the button if you would like, but to most accurately reflect the look of the built-in share button, only the icon should show.
OPTIONAL: You can also uncheck the box for "customizable" if you do not want users to be able to add, remove or rearrange buttons in the toolbar.
Populate the Menu Items
At this point, the button looks exactly like a built-in share button, but it doesn't do anything. Now, we will populate the menu with options, such as Messages, AirDrop, and so on.
To do this, first access the NSMenu object associated with the button. Accessing it is similar to how we accessed the NSPopUpButton earlier. To get to the NSMenu, you can either double click on the toolbar item, or single click the toolbar item, and then using the path bar, go to Custom View (or whatever you titled the toolbar item) > Textured Rounded Button (may still say "Item 1") > Pop Up Button Cell > Menu. This should expand the menu and show all of its NSMenuItem objects. You can rename these items to the desired options, such as Messages, Mail, etc. To add additional NSMenuItem objects to the menu, go to the object library in the lower right, search for "menu item," and drag a menu item object to the list of existing menu items.
Now, in a standard share menu, each of the menu items have icons next to them that represent the app icon of the sharing option being used. For example, the Messages sharing option has the Messages app icon next to it. Since these icons are not part of your app's bundle, you will need to set the image for each NSMenuItem programatically. You can either assign a referencing outlet to each item, or just for the NSMenu and then loop through each of its items. You should also set the images' sizes to 16x16, since it will use the image's default size unless you specify it, and that would be too large. Say you have an NSMenuItem assigned to a variable called theItem. You would set the image's size and assign it to the menu item with:
NSImage *theImage = [[NSImage alloc] initWithContentsOfFile:@"/path/to/icon.icns"];
NSSize theSize = {16, 16};
[theImage setSize:theSize];
[theItem setImage:theImage];
Below is a list of menu options that will appear in a typical share button, and the path to their icons. You can replace /path/to/icon.icns in the above code with the respective path.
| Sharing Option | Path to Icon |
| /Applications/Mail.app/Contents/Resources/ApplicationIcon.icns | |
| Messages | /Applications/Messages.app/Contents/Resources/Messages.icns |
| AirDrop | /System/Library/PrivateFrameworks/FinderKit.framework/Versions/A/PlugIns/AirDrop.appex /Contents/Resources/AirDrop_AppIcon.icns |
| Notes | /Applications/Notes.app/Contents/Resources/AppIcon.icns |
| Reminders | /Applications/Messages.app/Contents/Resources/icon.icns |
| /System/Library/PrivateFrameworks/ShareKit.framework/Versions/A/PlugIns/Twitter.appex /Contents/Resources/icon.icns |
|
| /System/Library/PrivateFrameworks/ShareKit.framework/Versions/A/PlugIns/FacebookPost.appex /Contents/Resources/icon.icns |
|
| /System/Library/PrivateFrameworks/ShareKit.framework/Versions/A/PlugIns/LinkedIn.appex /Contents/Resources/icon.icns |
|
| Photos | /Applications/Photos.app/Contents/Resources/AppIcon.icns |
OPTIONAL: Note that the name of the icon is different for certain icons in older macOS versions, but the path up until the icon name should be the same. If your app will be compatible with these older versions, you should check the above paths to find the correct icon name. You should consider including if statements in your code around the NSImage declaration, with each one handling a different OS version (or range of versions where the icon name is the same). You could obtain the user's OS version with a shell script like:
osascript -e "get system version of (system info)"
After you have done all of this, the share button is practically complete. All that you need to do now is create methods in your .m file that you will assign as the sent action for each of the NSMenuItem objects for the share button. These methods can perform whatever function you would like.
| Back: |
Ask: |
Rate:
 |
Share: |
Print: |
Article ID: AD2102
Overall User Rating: [NO RATINGS]
